Septic Systems
Septic System Maintenance
From Chapter 5 of The Septic System Owner's Manual
In the last chapter we talked about what goes down the drain. Here we’re going to cover long-term periodic maintenance, which consists mainly of septic tank inspection and pumping when necessary. We’ll also discuss drainfield inspection.
People often say, “Oh, I’ve never had to pump my tank,” as if that were proof that their septic system works fine. But be aware, failure to pump tanks is (next to improper siting and design) perhaps the greatest single cause of septic system failure. Here’s what can happen:
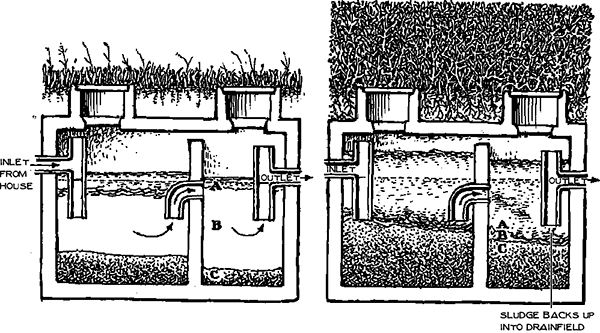
HEALTHY TANK CLOGGED TANK
A. Scum at top: cooking fats, oils, grease, soap scum, other floatables
B. Liquids in middle
C. Sludge at bottom: solids heavier than water and what is left over after solids have been partially eaten by bacteria. Once sludge gets up to outlet pipe, it enters and clogs drainfield.
Drainfield Failure
After several years of use, a build-up of bottom sludge and floating scum will reduce the effective capacity of the tank, as shown in the “clogged tank” illustration on page 48. This means waste passes through the tank too fast, and solids eventually plug the pipes in the drainfield. The microorganisms in the drainfield no longer have an aerobic (with air) environment in which to perform their cleansing action; they are now struggling to survive in an anaerobic (without air) environment. Either untreated effluent begins surfacing on the ground or sewage backs up into house drains. At this point, the system has failed, and a new drainfield is required — expensive!
THE MOST IMPORTANT SINGLE THING A HOMEOWNER CAN DO IS TO AVOID PLUGGING OF THE DRAINFIELD. AN EXCELLENT AID IN DOING THIS IS AN EFFLUENT FILTER (SEE P. 9 AND P. 174).
Inspection and Pumping
Inspect the Tank
How can you avoid drainfield failure? Inspect the tank at regular intervals and pump when necessary. In many parts of the country, it is recommended that tanks be pumped every three to five years, but recent studies indicate that a functioning tank, without abuse, may only need pumping every 10 to 12 years. Since there are many variables, we recommend an inspection every three to five years and basing pump-outs on inspections. As the years pass, you should be able to see the pattern of sludge and scum accumulation.
Keep a Record
Use a file folder (or get your wastewater district to get the Homeowner’s Septic System Guideshown on page 180) to keep a record of inspections and dates when the tank has been pumped.)
What Is Pumping?
Septic tanks are pumped by a licensed pumper with a vacuum tank truck. The pumper will use a 4-to-6-inch-diameter hose and vacuum everything out of the tank (both solids and liquids).
Waste pumped from a septic tank is called septage. It is approximately 5% solids and 95% water. (Raw sewage is 1% solids and 99% water.) The septage waste must be taken to a licensed disposal site because of the potential health problems with contamination. In many rural areas, private companies have developed septage disposal sites — generally evaporation ponds. In other communities, there may be a centrally located sewage plant that can handle the septage waste.
Where Is It?
Locating the Tank
You can save some money by locating the tank yourself and digging up the manhole covers. If the tank has no risers over inspection holes, and no diagram is available showing the location, you will have to probe for the tank, as follows: Use a long metal rod (½-inch rebar, bent over 90° to make a handle at the top) and begin probing where the main drain pipe leaves the house. Push the rod firmly down into the soil until you “feel” the drain pipe. Use a firm and steady push. Don’t punch or pound the rod as you can damage the pipe, particularly the pipe/septic tank connection. If the soil is too hard and dry for probing, try soaking the area with a garden hose.
Another method: There may be lush growth over the drainfield. Then the tank will be in an obvious place between the house drain and the drainfield. Or, you can run a snake down the clean-out to the tank and locate it with a metal detector.

When you find the drain pipe at one spot, move a little further from the house and probe again. Continue along the path of the drain pipe until you locate the tank. The tank will probably be 1 to 3 feet underground and at least 5 feet from the building. Once you locate it, dig up both manhole covers. Or, if you’re lucky, the tank will have risers with sealed caps instead of the very heavy manhole covers of earlier models. If you plan to inspect your own system and don’t have these risers (see p. 6), we recommend that you have them installed. In addition to providing easy access for inspection, they keep out dirt and rainwater. In the meantime, use a rope through the metal handles on the concrete manhole covers to swing them up and off the tank. The tank is now ready for inspection and/or pumping.
Note: Once you locate your tank, make a diagram of where it is for future reference, indicating number of feet from a particular point of the house.
Know Where Thy Tank Lieth!
B & M Contractors, of Bolinas, Calif., tells the story of some people who added a kids’ bedroom to their house without checking the location of the septic tank. All went well until one day, the system failed and it was then discovered that the room had been built over the the tank. To get to it, the pumpers had to pull back the rug, cut a hole in the floor, run their suction hose into the room through a window, and pump out the tank. Yuck!
Tank Inspection
Checking It Out
You can save money by doing your own inspections. This way you will only call the pumper when needed. Inspection is done from above, by looking in through the manholes. Look around inside with a flashlight and perhaps even a hand mirror attached to a long pole. When checking tanks be sure to wear gloves and to wash your hands thoroughly with an anti-bacterial soap afterwards.
However, if you’ve had no experience, it’s hard to know what to look for. If you intend to make your own inspections, we suggest you have the pumper come out the first time and that you watch how s/he performs the inspection. Ask questions. Then, the next time you should be able to do it yourself.
WARNING: BE VERY CAREFUL AROUND SEPTIC TANKS. THE FUMES CAN KNOCK YOU OUT. FALLING INTO A SEPTIC TANK CAN BE FATAL. NEVER ENTER A TANK. FOR A SUMMARY OF SEPTIC SAFETY, SEE
inspectapedia.com/septic/Septic_Tank_Safety.php
What to Look For
Once the tank is open, here’s what to look for (assuming the tank has two compartments):
Inlet Chamber
Odor: Odors should not be too obnoxious when you open the inlet side. (Odors will be a lot stronger when you stir the contents.)
Insects: There should not be too many flies or flying insects present.
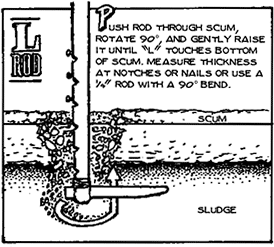
Scum: Should be firm, with a crust, but not solid. It should be like pudding, a medium brown color, and 3 to 4 inches deep. By poking a stick through the scum, you can estimate the average thickness. Or, you can fashion an “L-rod,” as shown at the top right. You can figure on there being equal amounts of scum above and below the water line.) Tip: Sometimes you can use a hose with high pressure to squirt a hole in the scum big enough to estimate its thickness.
Sludge: You can use a long stick, but best is a concrete hoe (the type with two holes is best) and an extension handle wired or taped on. As you lower the hoe, it’s a little tricky is to tell when you first hit the sludge. Thus, proceed slowly. If you feel resistance halfway to the bottom, it needs pumping.
Inlet tee: Concrete tees deteriorate.
Outlet Chamber
Scum: In a two-compartment tank, there should be little, if any, scum on the effluent side — the effluent should appear relatively clear. If there is much scum here (more than 2 inches), the tank needs pumping. If either scum or sludge is floating out the outlet, the tank needs pumping. In a one-compartment tank, a rule of thumb is that the tank should be pumped when the sludge is 20 inches and the scum is 10 inches.
Outlet tee: If the inside of this tee is clogged, the tank is flooding, and this could indicate trouble with the drainfield. If the top is dry, it’s a good sign, since a wet top would indicate the tank is flooding. If the tank is flooding, there is no air at the top of the tank, and this anaerobic condition can result in tank deterioration.
A COOL SLUDGE/SCUM TOOL
Get a 1-inch clear plastic tube, 5 to 6 feed long. Slowly push the tube to the bottom of the tank, then cover the top with your thumb and remove carefully. Wipe the tube off, and you should be able to see a profile of your tank, including sludge, clear effluent, and scum.

HOMEMADE SLUDGE-MEASURING DEVICE
You can use hoe to measure depth to sludge, then a rod to measure depth of sludge.
Outlet tee deterioration: A concrete or ceramic outlet tee in a tank can deteriorate above the water line due to sulfuric acid. This is easy to replace with a plastic tee and should be inspected periodically.
Baffle wall deterioration: The baffle wall between the two chambers can deteriorate as well. Consider putting an effluent screen in place rather than trying to repair the baffle wall, or replace the tank. A local septic tank inspector mentioned an owner who went into his tank to repair a baffle wall and was sick for over a year as a result. In Oregon, for example, most new tanks are now one chamber with an effluent screen. Cost for installing a screen might be $200 to $300. (See pp. 8–9.)
Insects
Mosquitoes and flies can be a problem if they enter and breed in a septic tank. Strangely, this is not often mentioned in literature on the subject. Mosquitoes and flies can enter through the plumbing vent of the house, go down through the 4-inch drain pipe and through the inlet tee to the tank. They can then breed in the tank and travel via the same route, reversed, to the outside world. You can cover the top of the vent with a capper of stainless steel screen. Another place for mosquito entry can be tanks with wood or fiberglass risers; here the manhole covers can be sealed with roof patch or a plastic sheet over the lids, then covered with a few shovelfuls of sand.
If the Tank Needs Pumping
Try to be there when the pumping is done. Lean over the shoulder of the pumper and make sure the tank is pumped completely. We heard about one company that pumped only the liquids and no solids. As the tank is pumped, it should be cleaned out as thoroughly as possible with a hose. There will be plenty of bacteria left to reactivate the system even when the tank is thoroughly cleaned.
It is difficult to suck out the bottom 2 to 3 inches of sludge, particularly if it contains a lot of sand. The pumper should hose down the sludge on the bottom when it is exposed so that it will partially liquefy and can then be sucked out. A high-pressure squirter, not a thumb applied to the hose, should be used.
Drainfield Inspection
If the drainfield was properly designed and installed (and the tank functions properly), it should be mostly maintenance-free. However, here are some tips.
Drainfield Test
Lush plant growth over the drainfields (or tank) may be a sign of sewage surfacing. Here’s one way to check the drainfield’s absorption capacity: run 40 to 80 gallons of water into the tank and, with the outlet riser open, watch how long it takes to drain into the drainfield. A slight back-up from the normal tank water level (the bottom of outlet pipe) is OK. The water level may rise H to 1 inch, but if the field is unclogged (and not flooded), a fully-flooded tank should drop to normal in five to ten minutes.
The “French Drain”
If the original installation didn’t allow for good drainage of surface waters (rain or run-off) around the drainfield, drainage ditches (with proper setbacks from the drainfield) may be needed. Also, a high water table in winter and/or dense soil can cause effluent to surface, causing bad odors and a possible health hazard.

Roots
Trees or shrubs with aggressive, water-seeking roots growing near the drainfield can cause real problems in conventional drainfields. The roots will seek out water, and can run inside the drainfield pipes and choke off the flow of effluent. Willow roots are notorious drainfield invaders.
Dual Drainfields
If you have a dual drainfield with a diverter valve, rotate the valve to the alternate field every six months or year. (See p. 20.) This allows the trenches to dry out and rejuvenate.
Soil Compaction
Be sure no one parks cars over the drainfield. It will compact the soil and reduce the aerobic capacity of the drainfield. Also, be sure cars don’t drive over the inlet and outlet pipes to the septic tank. This can snap the pipes and even cause the tank itself to crack.
Pump Maintenance
For mounds, sand filters, STEP systems, and lift systems for gravity drainage fields:
Run the pump through its cycle periodically to make sure there are no leaking pipes.
Pumps should have alarms.
Pumps should have check valves. Note: in areas of severely cold weather, check valves can be detrimental to proper pump operation.
Keep Those Hands Clean!
Just as you can pick up a cold or the flu by getting germs on your hands and then touching your hands to your nose, you can pick up some much nastier organisms if you have manual contact with an open tank or drainfield. If you’re going to do your own inspection or repairs, wear gloves and wash your hands scrupulously afterwards.
Never Been Pumped
The fallacy: You often hear a homeowner say, “Oh, I’ve never had to pump my tank.”
The irony: Typically, the homeowner has never had any septic system problems and thinks this means nothing need be done.
The remedy: Just as you need to check the oil level in your car so it doesn’t get too low, you need to periodically check the solids level in your tank so it doesn’t get too high.
summary
Sludge and scum accumulate in every septic tank. How much and how fast depend upon a number of conditions.
You can save money by locating the tank yourself and inspecting scum and sludge levels to determine when pumping is necessary. (However, there is a learning curve.)
Inspect your tank every three to five years until you determine the inspection frequency required for the future.
Scum and sludge must be pumped on a regular basis or system failure can result.
Drainfield operation can be maximized by checking the tank’s outlet tee, by testing the drainfield’s absorptive capacity (see pp. 52–53), by ensuring good drainage, and by avoiding soil compaction.
Red Alert!! System Failure
From Chapter 5 of The Septic System Owner's Manual
Your system has failed — that’s presumably why you’re reading this chapter. Water has backed up into the shower, the toilets won’t flush, and/or drains won’t drain. This means wastewater has backed up from the tank through the main drain into the house. It’s going the wrong way! Or — untreated effluent is surfacing on the ground. In this chapter we’ll talk about different types of failures, their causes, and what to do when your system fails.
Probable Causes of Failure
One or more of the following may have happened:
The sewage pipe between the house and the tank is blocked or broken.
Either the inlet or outlet tee is blocked or broken.
The line between the tank and drainfield is blocked or broken.
If the system has a pump, there may have been an electrical or mechanical failure.
The tank itself is blocked with solids or has collapsed (an old redwood tank perhaps).
The drainfield is flooded due to heavy rains or flooding.
The drainfield is (partially or completely) clogged with solids or roots.
Locating the Problem
When the septic system is failing, there is a procedure for locating the cause, called the discovery process, in which you search for the problem in the following order:
System Blockage
You start by searching for a blockage somewhere in the system because this is the easiest cause to locate, and the easiest (and cheapest) problem to solve.
If only one fixture does not drain, check for blockage between the fixture and the main drain pipe. Use clean-outs for checking.
If all fixtures on one branch of the drain pipe do not drain, check for blockage in that branch. Also, check the tank inlet for blockage.
Open the tank.
If it is flooded: The problem may be at the outlet or beyond. Check the outlet for blockage.
If it is not flooded: You can check the various household fixtures by running a hose down them to see if the water makes it to the tank.
If sewage is not arriving at the tank, then check for a pipe line blockage between the house and the tank.
If both the outlet and the inlet tees are good, but sewage is still backing up in the tank and house plumbing, the problem may be in the tightline (pipe between tank and drainfield) or the drainfield itself.
To check the tightline, you’ll have to dig it up where it enters the drainfield. Try a plumber’s snake to check for a blockage between the tank and drainfield. Or, the tightline may be broken or sheared off.
If the tightline is clear and intact, and all of the above steps have not produced the culprit, the drainfield is probably the problem.
Clearing Pipe Blockage
If the plumbing suddenly backs up under normal use, especially in dry weather, blockage is the prime suspect. This is generally the easiest problem to correct, particularly if it’s between the house and tank.
Most pipe blockages can be located using a plumber’s snake. (All tool rental stores have snakes.) Or, an old garden hose may work if there are not too many bends in the pipe. Also, there is a simple (and brilliant!) rubber device called the Drain King, which fits on the end of a garden hose. The hose is then run down the clogged drain pipe, and when the water is turned on, the bulbous rubber section expands, locks in the pipe, and emits strong pulsating bursts of water. These are available for 1- to 10-inch drains.
Root Blockage
If you find that roots between house and tank are the problem, a Roto-Rooter can clear the line, but the roots will return if the entry points (leaks) are not found and sealed.
Tightline Breakage
A common problem is that the tightline (pipe between tank and drainfield) has broken. This often happens when the tank, which is very heavy when filled, has settled in the ground some time after installation, and the pipe has not flexed. (In some areas, new systems now must include a flexible coupling at the septic tank wall.) As with pipe blockage, snaking the line usually helps you find this problem so the pipe can be either repaired or replaced. Sometimes it is easier and cheaper to replace the tightline, especially if roots are the problem, than to try to clear it.
Power Outage/Flooding
If you have an alternative system that uses electricity to pump the effluent to the drainfield and there is a power outage, the pump chamber should be checked immediately. If it is low, you’re OK, but monitor your water usage. If it is nearly full, water usage must be severely curtailed or the result will be effluent from the pump chamber backflowing into your house since there’s no electricity to pump the effluent to the drainfield — a distinct disadvantage to high-tech systems! You’ll have to wait until the electricity comes back on, or keep a small standby generator on hand for such emergencies.
If you live in an area with high groundwater and heavy rains, your tank and your pump chamber might be filling with rainwater runoff. It is wise to have good risers around the inspection holes of the septic tank since concrete lids generally leak. These risers are sold in many builders’ supply outlets.
Tank failure
Every tank has an estimated life span.
Redwood tanks: They can last from 15 to 45 years. Redwood tanks as well as steel tanks are now illegal in many areas. The top and upper sidewalls of a redwood tank will deteriorate first, causing the top to cave in (this can be dangerous, especially for kids) and the tank will start leaking in the upper 6 inches of liquid level. If a redwood tank fails completely, it’s best to replace it with a concrete or fiberglass one. However, if the sidewalls and bottom are good, installing a new top may gain you another 10 years.
Fiberglass tanks: They are light to handle, and quite durable, but they have been known to break due to shifting ground and are hard to repair.
Polyethylene tanks: They sometimes lack structural integrity. Manufacturers claim an estimated life span of 30 years.
Concrete tanks: They are usually precast and are the best and most common type of tanks.
Concrete tanks can develop leaks if the ground shifts, if the concrete was of poor quality, or (very common), when the joint between top and body leaks. Further:
The tank may be porous and leak from the start.
The tank may not be properly sealed and small leaks can grow larger. Leaks can be fixed, but the tank must be properly cleaned and prepared, and techniques are difficult and dangerous in an older tank.
All tanks can leak around the inlet and outlet connections. This can usually be repaired by re-sealing the joints with caulk or mortar. Due to accumulation of gases, concrete outlet connections often disintegrate. Old ones should be replaced with plastic fittings.
Warning:Any underground tank that has had sewage in it is dangerous due to gases, especially if you are working alone. Only a trained professional with a self-contained breathing apparatus should enter a septic tank. Repairs to inlet and outlet tees can usually be completed without entering the tank, and should be done when the tank is pumped.
Drainfield Failure
This is the most serious and costly type of failure. Pipe blockages can be removed. Loose connections can be fixed. A faulty tank can usually be repaired. But if the drainfield is clogged, it must be replaced, a disrupting and costly procedure.
Suspicious Drainfield Behavior
You can suspect the problem is the drainfield if:
there are odors or persistent wet spots over the field
the plumbing becomes sluggish over a period of time, or when it’s used heavily, or during wet months
problems persist even though the tank has been pumped recently
the septic tank is flooded
Why Do Drainfields Fail?
Clogging with solids: When a tank has not been pumped periodically, it fills up and eventually the solids migrate out of the tank into the drainfield. Also, old drainfields can be clogged by soil infiltration. Either the perforated distribution pipe or the pores in the soil become clogged.
Root blockage: Root growth near a septic system is a mixed blessing. The good news is that plant growth over a drainfield will absorb much of the discharge; further, in arid areas, evapotranspiration will release the water back into the environment. The down side is that the same root growth that absorbs water can clog disposal lines and trenches and hinder drainfield function (although root blockage is not the same problem in a shallow drainfield).
Root deterrent products do kill roots, but we don’t recommend them, any more than we’d recommend putting Drano down the drain. Most of these products contain copper sulfate, or “bluestone,” which can kill off the beneficial organisms in both the tank and the drainfield, and poison things if it gets in the water table. (These products also produce toxins in the manufacturing process.) Far better to snake out the line and then remove the source of the roots.
High groundwater: When a drainfield is saturated with groundwater, it won’t be able to perform its cleansing action. It’s possible to improve things with better drainage.
Two Degrees of Drainfield Failure
Partial failure: Here the drainfield will work during dry weather, but with heavy rains (or high household use), the system is overloaded.
Complete failure: Worst case scenario. Here no remedial steps can be taken with the present drainfield.
Remedies for Partially Failed Drainfields
Cleaning the distribution pipe in the trench may work if things have not progressed too far. Have it snaked out with a Roto-Rooter.
If caused by roots, dig up a section and look. Remove invasive trees and plants. Roto-Rooter pipes. Consider removing invasive trees or plants. The drainfield may recover as dead roots decay.
Cut water usage in half, if possible.
Improve drainage.
The Distribution Box Solution
Engineer Rick Duncan recommends the following procedure for a saturated drainfield (here professional help is recommended): If there are several drainfield laterals, inspect them to see if they are all being overloaded. If not and if possible, put in a distribution box with flow levellers (or weir inserts). Adjust the levellers so effluent flows mostly to under-utilized lines. The idea is to allow the over-utilized lines to rest and rejuvenate — this may take a number of months, depending on local soil and climate.
If all drainfields are saturated, use a larger distribution box, with inserts, and install several replacement lines, leaving the existing lines hooked up as well. Here the old lines are not abandoned and they may be useful after being rested a while.
Note: Concrete distribution boxes tend to deteriorate rather rapidly, especially in acidic soils. High-density, polyethylene D-boxes solve this problem.
Remedies for Completely Failed Drainfields
Hire a professional to install a new drainfield, or better yet, dual drainfields or a pressure-dosed shallow drainfield.
Do it yourself if you know what you’re doing. Here you’ll act as the contractor — hiring a backhoe, dumptruck for gravel, etc. However, it’s very important that the drainfield be properly designed and installed — this isn’t an area for guesswork. Consult local professionals.
“Repair-As-Is” Option
If you approach your local health department regarding a drainfield failure, they will often require a much larger drainfield than was originally installed, as well as a larger tank, or, in some cases, an entirely different system (a mound, sand filter, etc., along with the machinery required to run these units). There is, however, an exception, and that is the “repair-as-is” option. This is where the health department will allow you to:
pump out the tank and ensure that the tank and all connections are functioning properly.
install a replacement drainfield the same size or larger than the original, or a dual drainfield, or a pressure-dosed shallow drainfield.
This seems to us a desirable alternative, especially if, for instance, the garbage disposal is disconnected and the home residents follow practical daily domestic wastewater practices, as shown in Chapter 4 (pp. 38–45). It saves money and materials, is kinder to the environment, conserves energy (gravity power vs. electricity), and is lower maintenance.
Old-Fashioned Muscle Power
We have heard reports of a small town in Southern California where a number of septic systems have been failing in recent years, and the county health department has been requiring high-tech fixes — mounds, sand filters, pumps, etc. — often costing $20,000–$30,000.
An local enterprise has sprung up: a worker has been hand-digging new drainfields, installing pipe, new gravel, and permeable membrane, for a total of around $700. At the same time, the tank is pumped, tees checked and (hopefully) the householders follow the advice in Chapter 4 (pp. 38–45) and end up with a few more decades of a functioning system.
Terra-Lift Soil Loosener
This is a machine that uses pneumatic pressure to clear clogged drainfields.
Consulting Regulatory Agencies and Engineers
The above brings up what is often a homeowner’s dilemma — a “rock and a hard place” situation. What if a regulatory agency is requiring an upgrade that you cannot afford, yet you are uncomfortable with sidestepping regulations or making the repairs on your own?
There are sound historical reasons for health regulations. A century ago, when much of America was sparsely populated, relatively primitive systems, such as outhouses and cesspools, were widely used. If an unsanitary situation developed, it was confined to the farm or homestead. But as the population grew, as people began living closer together, and as health problems surfaced, regulations were enacted. For good reason.
Worst-Case Agency Scenario
The trouble these days is not with sound health codes, but with what we all may have experienced in one field or another: regulatory overkill. The worst-case scenario is an agency that will not consider anything other than a high-tech septic system. It will not allow the “repair-as-is” option, it will not countenance the standard gravity-fed septic system, nor is it open to new, lower cost solutions such as the recirculating gravel filter, or shallow pressure-dosed drainfields. The agency may even have a list of engineers that a homeowner must choose from.
Worst-Case Homeowner’s Scenario
The worst-case scenario in owner-installed or owner-fixed systems can be substandard, useless, or even dangerous repairs that can lead to civil or even criminal (!) action. Septic system design is not rocket science, yet neither is it simple or straightforward on many sites. Many systems fail because they are improperly designed and/or installed. Fixing a failed drainfield may be either simple and functional, or, if improperly done, a waste of time and materials. Another factor, of special interest if you are considering selling your home, has surfaced (sic) in recent years: Sellers have been sued for non-disclosure after the sale of a home and subsequent septic system failure. Seller beware!
Best-Case Scenarios
What’s a poor homeowner to do? The homeowner may want to step out of the agency/engineer/contractor loop and participate in some or all of the functions of fixing an ailing system. It would be ideal if you were able to consult with the regulatory agency, which would be in turn open to owner-controlled repairs, subject to inspection. Often, officials will help homeowners with guidance and advice. Additionally, the services of a professional septic systems engineer can be invaluable. Although a standard septic tank and its connections are not hard to understand, its placement, the hydrological capacity of the soil, and the type and placement of the drainfield are factors where professional help is often the difference between success and failure.
We can’t tell you what to do, but we hope we can make you aware of options and the range of consequences. Very often, officials will be open to a positive, well-researched owner approach. An engineer may be willing to work with you to solve your problems within your budget, telling you what functions you may perform yourself.